| disease | Peripheral Nerve Injury |
Peripheral nerve injuries are common in both peacetime and wartime. According to some statistics from World War II, peripheral nerve injuries of the limbs accounted for about 10% of all trauma cases, and approximately 60% of firearm fractures were complicated by nerve injuries. The most frequently injured peripheral nerves are the ulnar nerve, median nerve, radial nerve, sciatic nerve, and common peroneal nerve. Upper limb nerve injuries are more common, accounting for about 60-70%.
bubble_chart Etiology
The causes of peripheral nerve injury can be categorized as follows:
1. Traction injury. For example, brachial plexus injury caused by birth trauma.
2. Incised wounds. Such as knife cuts, chainsaw injuries, glass cuts, etc.
3. Compression injury. Such as nerve compression caused by fracture dislocation.
4. Gunshot wounds. Such as bullet wounds and shrapnel injuries.
5. Ischemic injury. Limb ischemic contracture also damages the nerves.
6. Electrical burns and radiation burns.
7. Drug injection injury and other iatrogenic injuries.
bubble_chart Auxiliary Examination
Based on the history of trauma, clinical symptoms, and examination, determine the location, nature, and extent of the nerve injury.
(1) Clinical Examination
1. Examination of the injured area: Check for the presence of wounds. If wounds are present, assess their scope and depth, the condition of soft tissue injury, and any signs of infection. Identify the trajectory of gunshot or shrapnel wounds, and check for vascular injury, fracture, or dislocation disease. If the wound has healed, observe the scar condition and the presence of stirred pulse tumors or arteriovenous fistulas.
2. Limb posture: Observe the limb for any deformities. Radial nerve injury results in wrist drop; ulnar nerve injury causes claw hand, characterized by hyperextension of the metacarpophalangeal joints of the 4th and 5th fingers and flexion of the interphalangeal joints; median nerve injury leads to ape hand; and common peroneal nerve injury causes foot drop. Over time, due to the imbalance of opposing muscles, joint contractures and other changes may occur.3. Examination of motor function: Assess the extent of nerve injury based on muscle paralysis, using a six-grade scale to classify muscle strength.
Grade 0—No muscle contraction;
Grade 1—Slight muscle contraction;
Grade 2—Achieves full joint range of motion without resistance to gravity;
Grade 3—Achieves full joint range of motion against gravity but cannot withstand any resistance;
Grade 4—Achieves full joint range of motion against gravity and with some resistance;
Grade 5—Normal.
Peripheral nerve injury causes flaccid paralysis of muscles, loss of tone, and progressive muscle atrophy. Depending on the severity of the nerve injury, muscle strength varies as described above. During nerve recovery, muscle atrophy gradually diminishes, and consistent exercise can lead to continuous improvement.
4. Examination of sensory function: Assess pain, touch, temperature, and two-point discrimination, as well as the extent of any changes, to determine the degree of nerve injury. Generally, checking pain and touch sensations is sufficient. Note whether the sensory supply area is innervated by a single nerve or overlaps with other nerves, and compare with the unaffected side. Object recognition and light touch are fine sensations, while pain and deep touch are crude sensations. After nerve repair, crude sensations recover earlier and more fully.
Sensory dysfunction can also be classified using a six-grade scale:Grade 0—Complete absence of sensation;
Grade 1—Presence of deep pain sensation;
Grade 2—Presence of pain and partial touch sensation;
Grade 3—Complete pain and touch sensation;
Grade 4—Complete pain and touch sensation, with two-point discrimination, albeit at a greater distance;
Grade 5—Completely normal sensation.
5. Trophic changes: After nerve injury, the skin in the affected area becomes cold, without sweating, smooth, and atrophied. Sciatic nerve injury often leads to pressure sores on the sole of the foot and frostbite disease of the foot. The area without sweating or with reduced sweating generally corresponds to the area of sensory loss. Sweat tests can be performed, commonly using (1) the iodine-starch test: Apply 2% iodine solution to the palmar side of the fingers, let it dry, then apply a layer of starch. Use a lamp to heat or have the patient drink hot water and exercise moderately to induce sweating, which turns blue. (2) Ninhydrin fingerprint test: Press the affected finger or toe onto clean paper (also after inducing sweating with hot drinks). Outline the finger or toe with a pencil, then immerse it in 1% ninhydrin solution. Sweat will reveal dotted fingerprints at the pressed area. Soaking in nitric acid solution fixes the print for long-term preservation. Sweat contains various amino acids that turn purple when exposed to ninhydrin. Repeated comparisons can track nerve recovery.
6. Reflexes: Depending on muscle paralysis, tendon reflexes may be absent or diminished.
7. The proximal end of the injured nerve may develop a pseudoneuroma, often causing severe pain and tenderness that radiates to the nerve's distribution area.
8. Tinel’s sign: After nerve injury or during nerve repair, lightly tapping the nerve at the injury site or the point where nerve regrowth has reached elicits radiating tingling pain in the nerve's distribution area, indicating a positive Tinel’s sign.(2) Electrophysiological Examination
Determine the scope and degree of nerve injury, post-anastomosis recovery, and prognosis through electromyography and evoked potential examinations.
bubble_chart Treatment Measures
General principles of management: ① Use repair methods to treat nerve rupture. ② Use decompression to relieve compression from fracture ends. ③ Use release methods to relieve scar adhesion and constriction. ④ Use exercise to restore limb function.
(1) Non-surgical therapy
For peripheral nerve injuries, whether surgical or not, the following measures should be taken to maintain limb circulation, joint mobility, and muscle tone, and to prevent deformities and trauma. Paralysis limbs are prone to trauma, frostbite, burns, and pressure injuries, so care should be taken to protect them. The purpose of non-surgical therapy is to create conditions for the recovery of nerve and limb function, and it can be used both after injury and after surgery.
1. Relieve compression from fracture ends. Nerve injuries caused by fractures are mostly compressive injuries. Non-surgical therapy should be used first, such as manual reduction and external fixation of the fracture to relieve compression from the fracture ends on the nerve. Observe for 1–3 months, and if the nerve does not recover, consider surgical exploration.
2. Prevent overstretching of paralyzed muscles. Use appropriate splints to keep the muscles in a relaxed position. For example, radial nerve paralysis can be treated with a suspension spring splint (Figure 1), and foot drop can be treated with an anti-drop brace.

(1) Correct drop (2) Exercise wrist and finger movement
Figure 1 Suspension spring splint
3. Maintain joint mobility. Prevent deformities caused by muscle imbalance, such as foot drop leading to equinus foot and ulnar nerve paralysis leading to claw fingers. Perform passive movements to exercise full joint mobility several times a day.
4. Physical therapy, massage, and appropriate electrical stimulation. Maintain muscle tone and reduce muscle atrophy and fibrosis.
5. Exercise existing and recovering muscles to improve limb function.
(2) Surgical treatment
After nerve injury, the principle is that the earlier the repair, the better. Sharp injuries should be repaired in the initial stage (first stage). For gunshot wounds, initial stage (first stage) repair is not performed during early debridement; instead, intermediate stage (second stage) repair is performed 3–4 weeks after wound healing. If sharp injuries are not repaired early, intermediate stage (second stage) repair should still be attempted. The optimal time for intermediate stage (second stage) repair is 3–4 weeks after wound healing. However, time is not an absolute factor, and advanced stage repair can also achieve certain results. Do not easily give up treatment for patients who seek medical attention in the advanced stage.
1. Neurolysis (Figure 2). If the nerve is embedded in scar tissue, neurolysis should be performed. If the nerve is compressed by fracture ends, the compression should be relieved. If the nerve is embedded in scar tissue, the scar should be incised along the longitudinal axis of the nerve, and the scar tissue around the nerve should be removed. After external neurolysis, if the affected part of the nerve appears thickened, feels hard, or has nodules, it indicates that there is also scar adhesion and compression inside the nerve, and internal neurolysis should be performed. That is, incise the outer membrane of the nerve along the affected part and carefully separate the scar adhesion between the nerve bundles. After the operation, place the nerve in healthy tissue for protection.

(1), (2) External neurolysis (3) Internal neurolysis
Figure 2 Neurolysis
2. Nerve anastomosis
(1) Expose the nerve. Free the nerve from the normal part to the ruptured part, taking care not to injure the nerve branches.
(2) Remove the affected part of the nerve. First, remove the pseudoneuroma from the proximal segment until the cross-section shows normal nerve bundles. Then remove the scar tissue from the distal segment until normal tissue is reached, but do not remove too much, as excessive defects will make suturing difficult. Make a full assessment before removal to have a clear plan. If the length is insufficient, it is better to temporarily suture less healthy tissue or suture the pseudoneuroma and fix the joint in a flexed position. After 4–6 weeks, remove the plaster cast and gradually practice straightening the joint to lengthen the nerve. After three months, another surgery can be performed to remove the unhealthy nerve tissue.
(3) Overcoming Nerve Defects After resection of the diseased nerve segment, the resulting defect may make suturing difficult. Solutions include mobilizing the proximal and distal nerve segments and flexing the joint, or relocating the nerve (e.g., transposing the ulnar nerve from behind to in front of the elbow) to bring the two nerve ends closer together. The suture site must be tension-free. If the defect between the ends is too large for tension-free end-to-end anastomosis, nerve grafting should be performed. In cases of limb replantation or nonunion fractures with significant nerve defects, shortening the bone may be considered to facilitate end-to-end nerve anastomosis.
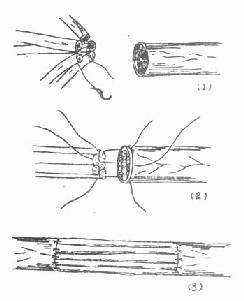
(4) Suture materials and methods. The suture materials can be human hair or 7-8 "0" nylon thread. The suture methods include the epineurium suture method (Figure 3) and the perineurium suture method (Figure 4). The former only sutures the epineurium, and if the anastomosis is accurate, good results can often be achieved. The latter involves separating the nerve bundles at both ends under a microscope and suturing the corresponding perineurium of the nerve bundles. This method can improve the accuracy of alignment between the two ends of the nerve bundles. However, during surgery, there is currently no rapid and reliable method to accurately identify the nature of the nerve bundles at both ends (distinguishing between motor and sensory fibers). Therefore, perineurium suturing also carries the possibility of mismatching, and extensive dissection between bundles may injure the communicating branches between the nerve bundles. Under good repair conditions, there is no significant difference in the effectiveness of the two anastomosis methods. Generally, the epineurium suture is preferred because it is simple and easy to perform, requiring no special equipment or skills. At locations where the distal end of the nerve naturally divides into bundles, the perineurium suture method is advisable. For partial nerve injuries, after separating the normal and injured nerve bundles, the perineurium suture method can be used to repair the injured nerve bundles (Figure 5).
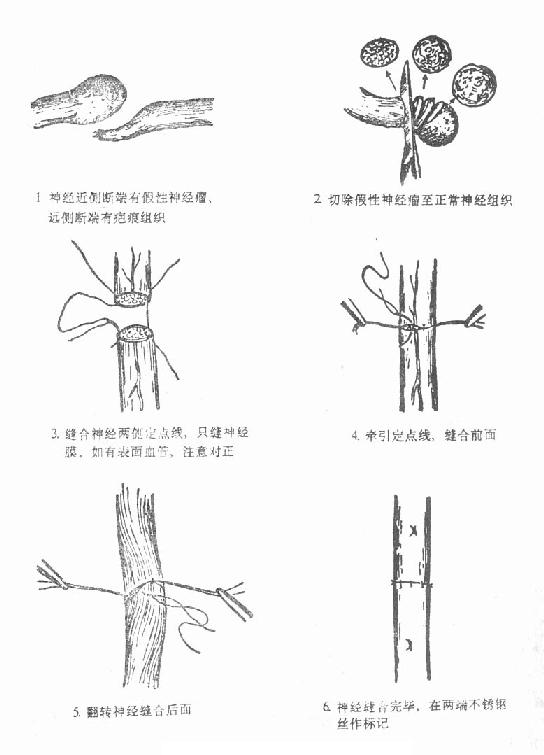
Figure 3 Schematic diagram of epineurium suture
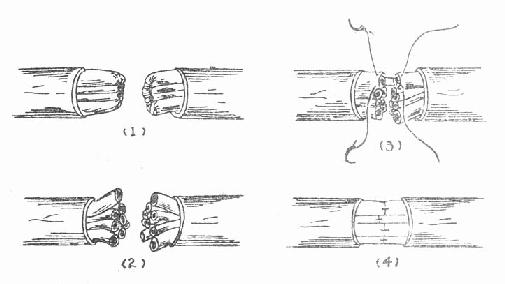
Figure 4 Schematic diagram of perineurium suture
(1) Circumferentially remove 1 cm of the epineurium at the nerve ends
(2) Separate the nerve bundles at both ends and remove the scar tissue at the bundle ends
(3) Suture the corresponding nerve bundles, with the needle and thread passing only through the perineurium
(4) Completion of the suture
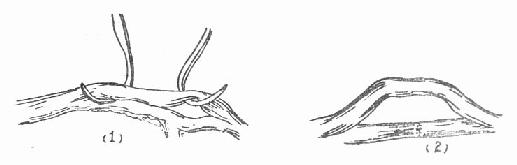
Figure 5 Repair of partial nerve rupture
(1) Dissect out the normal nerve (2) Anastomose the ruptured part
Advanced stage nerve injuries (those not repaired for over a year) also have repair value. We summarized 169 cases of advanced stage nerve injuries, with excellent results in 62.1%, useful sensory recovery in 23.1%, and a total effective rate of 85.2%.
3. Nerve transfer and transplantation
When the nerve defect is too large to overcome by methods such as joint flexion or nerve dissection, and there is significant tension in end-to-end anastomosis, nerve transfer or transplantation should be performed. However, the results of nerve transplantation are generally not as satisfactory as end-to-end anastomosis.
(1) Nerve transfer. In hand injuries, the residual nerve of an amputated finger can be used to repair the nerves of other injured fingers (Figure 6). In the upper limb, the superficial branch of the radial nerve can be transferred to repair the sensory nerve of the distal median nerve or the superficial branch of the ulnar nerve. In cases of root-level brachial plexus injuries, the phrenic nerve can be transferred to repair the musculocutaneous nerve, or the motor branches of the cervical plexus can be transferred to repair the axillary nerve or the suprascapular nerve.
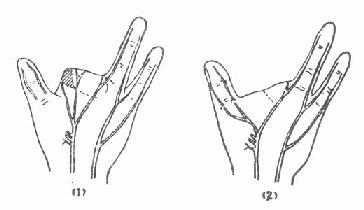
Figure 6 Transfer of residual finger nerves to anastomose the two nerves of the thumb
(2) Nerve transplantation. Autologous nerve transplantation is the first choice. Commonly used nerves for transplantation include the sural nerve, saphenous nerve, medial antebrachial cutaneous nerve, lateral femoral cutaneous nerve, and superficial branch of the radial nerve.
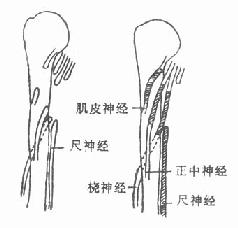
When multiple large nerves are injured simultaneously, one of them can be used to repair other important nerves. For example, in upper arm injuries where the median, ulnar, radial, and musculocutaneous nerves all have significant defects and end-to-end anastomosis is not possible, the ulnar nerve can be used to transplant and repair the median, musculocutaneous, and radial nerves (Figure 7).
|
|
|
| Figure 7 Repair of the radial nerve using the ulnar nerve, median nerve, and musculocutaneous nerve | Figure 8 Schematic diagram of cable nerve free | transplantation
There are several methods of nerve transplantation, which can be selected based on the situation.
① Single-strand nerve free transplantation method: The nerve used for transplantation should be similar in thickness to the nerve being repaired. For example, when using cutaneous nerves or nerves from a discarded finger to repair a digital nerve, the epineurium suture method can be employed to anastomose the transplanted nerve with the nerve being repaired. The length of the transplanted nerve should be slightly longer than the distance of the nerve defect to ensure no tension at the suture site after repair.
② Cable nerve free transplantation method: If the nerves used for transplantation are thin, multiple strands must be combined to repair the defective nerve. First, the transplanted nerve is cut into multiple segments, and the epineurium is sutured to form a larger nerve, which is then sutured to the nerve being repaired (Figure 8). Due to the imprecise alignment of nerve bundles, the effectiveness of this method is uncertain.
③ Interfascicular free transplantation method: This is performed under a surgical microscope. The technique is the same as the fascicular epineurium suture method. First, 1 cm of the epineurium at both ends of the nerve is excised, and the corresponding nerve bundles are separated. The scar at the ends of the nerve bundles is removed to reach normal tissue. Then, the transplanted nerve bundles are placed between the corresponding nerve bundles for fascicular epineurium suturing (Figure 9).
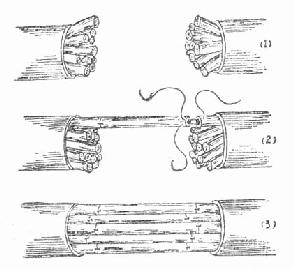
Figure 9 Schematic diagram of interfascicular free transplantation
(1) Circular excision of 1 cm of the epineurium at the nerve ends, separation of each nerve bundle, and removal of scar tissue at the nerve bundle ends
(2) Suturing the transplanted nerve to the corresponding nerve bundle using the fascicular epineurium method
(3) Completion of interfascicular suturing
④ Pedicle nerve transplantation method: Generally, thinner nerves do not undergo necrosis after transplantation. However, when using thicker nerves for transplantation, the free segment often suffers from ischemia, leading to central necrosis of the nerve and interfascicular scarring, which affects the transplantation outcome. The pedicle method can prevent this. For example, after resecting the pseudoneuroma of the median and ulnar nerves proximally and performing end-to-end anastomosis, the proximal ulnar nerve trunk is severed while preserving its blood vessels as much as possible. Six weeks later, the proximal end of the ulnar nerve is severed and sutured to the distal segment of the median nerve (Figure 10).
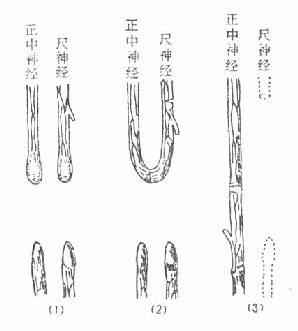
Figure 10 Pedicle nerve transplantation method
(1) Ulnar nerve and median nerve injury
(2) Resection of the neuroma and anastomosis of the two proximal ends, with proximal transection of the ulnar nerve trunk while preserving nutrient vessels
(3) Six weeks later, transection and freeing of the proximal ulnar nerve, pedicle transplantation, and anastomosis with the distal median nerve
⑤ Vascular pedicle nerve free transplantation method: This often involves using the sural nerve with the small saphenous vein for free transplantation. The small saphenous vein is anastomosed with a known stirred pulse in the recipient area to provide blood supply to the transplanted nerve segment.
4. Muscle transfer surgery
When nerve injuries cannot be repaired, muscle transfer surgery is performed to restore function. For example, if the radial nerve injury cannot be repaired, flexor muscles can be transferred to replace the extensor pollicis, extensor digitorum communis, and extensor carpi radialis muscles. If the ulnar nerve cannot be repaired, the flexor digitorum superficialis can be transferred to replace the interossei and lumbrical muscles. If the thenar branch of the median nerve cannot be repaired, the flexor digitorum superficialis of the ring finger, extensor carpi ulnaris, or abductor digiti minimi can be transferred to replace the opponens pollicis. If the musculocutaneous nerve cannot be repaired, part of the latissimus dorsi or pectoralis major can be transferred to replace the biceps brachii, and so on.
5. Postoperative Management
After fixing the joint in a flexed position with Gypsum (Figure 11), ensure the anastomosed nerve is free from any tension. Generally, the Gypsum is removed 4 to 6 weeks postoperatively, and the joint is gradually extended, followed by joint activity exercises and tuina of the relevant muscles to promote functional recovery. However, extending the joint should not be rushed to avoid rupturing the anastomosis. Additionally, care should be taken to protect the affected limb from trauma, burns, and frostbite disease.
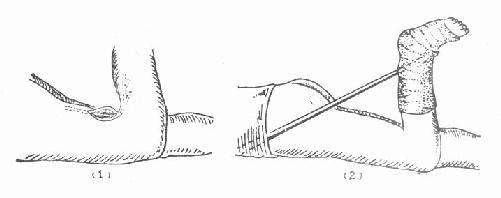
Figure 11 Gypsum fixation after sciatic nerve anastomosis
(1) Anastomosis of the sciatic nerve with the knee joint flexed;
(2) Postoperative Gypsum fixation with the knee joint flexed and the hip joint extended.